Creating Spring Boot Rest Api / RESTFul Service in java
Spring boot makes easy to create stand-alone, production-grade Spring-based applications, here are basic steps to create Rest api.
Please click on Creating Spring Boot Project if you have not set up spring boot project yet.
Create Controller
A controller is a class that handles incoming HTTP requests and provides an appropriate response. In Spring Boot application, controllers are typically annotated with @Controller or @RestController annotations.
1. @Controller : This annotation is used to define controller, it is specialization of @component which is used to identify spring components
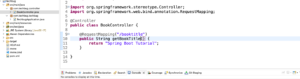
import org.springframework.stereotype.Controller;
import org.springframework.web.bind.annotation.RequestMapping;
@Controller
public class BookController {
@RequestMapping(“/booktitle”)
public String getBookTitle() {
return “Spring Boot Tutorial”;
}
}
2. @RestController : It is combination of @Controller and @ResponseBody annotations. The @ResponseBody annotation tells Spring that the return value of the method should be serialized directly to the body of the HTTP response.
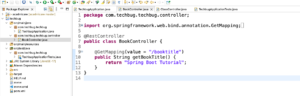
import org.springframework.web.bind.annotation.GetMapping;
import org.springframework.web.bind.annotation.RestController;
@RestController
public class BookController {
@GetMapping(value = “/booktitle”)
public String getBookTitle() {
return “Spring Boot Tutorial”;
}
}
Controllers often interact with services, which handle business logic, and repositories, which handle data access. And additionally uses annotations like @RequestMapping or @GetMapping to specify the URL patterns.
After Running application, Open browser and hit http://localhost:9080/yourcontroller mapping.
http://localhost:9080/booktitle

2 Replies to “Building Spring Boot Rest Api in Java”